From the moment I first set my eyes on a fondant cake I knew that if I can afford it, that's the cake I want for my son's first birthday! But...I couldn't! The oven intimidated me. I remember the first time I baked out of the box - brownies hard as rocks came out. In the Philippines, we had this saying "Kapag binato ka ng bato, batuhin mo ng tinapay" (If a rock is thrown at you, throw a bread back). Basically, it means always avenge yourself using kindness. But, if I used those brownies?! It's like getting even, man!
After a couple of practice cakes, the moment has arrived for me to make my official first birthday cake for public consumption! How nerve-wracking!
I didn't want just a pretty cake. I also want one that people will actually eat. So, after gaining 5 pounds from eating all my practice cakes, I finally found a great recipe.
When the cake part was covered I started contemplating on a design. I found a Circus-themed photo cake topper
 |
| Here's my initial sketch and the Photoshop version with the Wilton cake topper. |
TOOLS I USED
- 2 - 6 in. round pans
- 2 - 9 in. round pans from my Bakeware Set
- Round Cut-outs
- Star Cut-outs
- Rolling pin
- Smooth working surface or Rolling Mat
- Easy-Glide Fondant Smoother
Fondant Ribbon Cutter/Embosser
- Wooden Dowel Rods
- Decorating Brush
- Big Top Photo Cake Topper
- Alphabet/Numerals Icing Decorations
- 10 in. cake circle
cut to size (by tracing 9 in. round pan on it)
- 6 in. cake circle
- 10 in. silver cake base
- Knife
- Ruler
- Pizza cutter
- Beatty's Chocolate Cake
- Marshmallow Fondant
- Rolled Fondant Primary Colors Multi-Pack
- Yellow Icing Color
- Blue Icing Color
HOW I DID IT
- 3 days in advance: Made Blue and Yellow Marshmallow Fondant
- 2 days in advance: Baked and cooled 2-layer 6 in. cake and 2-layer 9 in. cake. Filled and crumb-coated them and just let them sit on our counter covered by inverted bowls. Cakes will stay fresh at room temperature for upto a week. Refrigerating cakes will dry it out. Freezing will retain moisture but since I already frosted the cake I didn't want to worry about condensation when I thaw it.
- Night before the party:
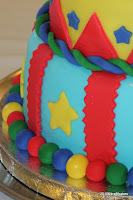
Red Zig-Zag edged Ribbon. Rolled out Red ready-to-use fondant
Stacking. Stacked yellow 6 in cake tier over the 9 in cake tier. Here's a video I watched to get an idea of how to stack my cake.
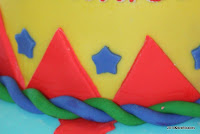
Red Triangles. Rolled out Red ready-to-use fondant
Small Blue Stars. Rolled out Blue ready-to-use fondant
Green and Blue Rope Border. On the box of the Wilton fondant
Medium Yellow Stars. Rolled out Yellow MMF and used the medium star cut-out
Rainbow Ball Border. For the rainbow colored balls border, I rolled out the Yellow MMF, Red, Blue and Green ready-to-use fondant
Happy Birthday. Used the Alphabet Icing decoration
Cake Topper. For the finishing touch, I printed a 2 in. x 2 in. photo of the celebrant to place on the Big Top photo cake topper
You may be interested in reading the Fondant for Beginners series:


Hi Karen, i just happen to be filipina myself! pero i really know the frustrations of baking. I just also started baking and decorating. Currently taking the wilton decorating class which i really find enjoyable but stressful at the same time. My motivation? My 11 month old son. i really really really want to do his cake for his 1st birthday. My time's running out ack!!! :) Im glad i found this blog to keep me inspired. Thank you for creating it
ReplyDeleteHi Annie, I did Course 1 of the Wilton classes, too! Hehehe. And I agree...so stressful! I don't think I'm a fan of buttercream. Once you try working with fondant, you'll probably stick with it. I haven't got a chance to continue with the other Wilton classes because of my 2 boys and my husband's work schedule so I really just rely on blogs and YouTube university! Hehehe Just using this blog to compile everything I've found so far and keep track of my progress. Thanks for reading. At least now I know that at least one other person besides my mother-in-law is reading it. LOL!
ReplyDeletehey, did you do the fondant and then put the dowels thru. cake came out really cute!
ReplyDeleteYes. I covered the tiers with fondant first. I put the dowel the bottom tier then stacked the top tier above it.
ReplyDelete